Installation
Set up your development environment
Installing Python and Setting Up Your Environment
Installing Python is a fundamental step in getting started with the language. In this tutorial, we will walk you through the installation process on different operating systems and help you set up an ideal development environment for your projects.
Why Install Python?
Before diving into the installation process, let’s understand why it’s important to install Python correctly:
- Compatibility: A correct installation ensures that your code will work as expected.
- Development environment: Set up your environment to make writing and testing code easier.
- Dependency management: Easily install and manage the third-party libraries your projects need.
- Updates: Stay current with the latest features and security fixes.
Which Version of Python Should You Install?
Python comes in two major versions: Python 2 and Python 3. Python 2 has not been maintained since January 2020, so we strongly recommend using Python 3 for all new projects.
At the time of writing, the latest stable version is Python 3.11, but any version 3.8 or later is perfectly fine for getting started.
Installing on Windows
Method 1: Use the Official Installer
-
Download the installer:
- Go to python.org
- Click “Download Python x.y.z” (where x.y.z is the latest version)
-
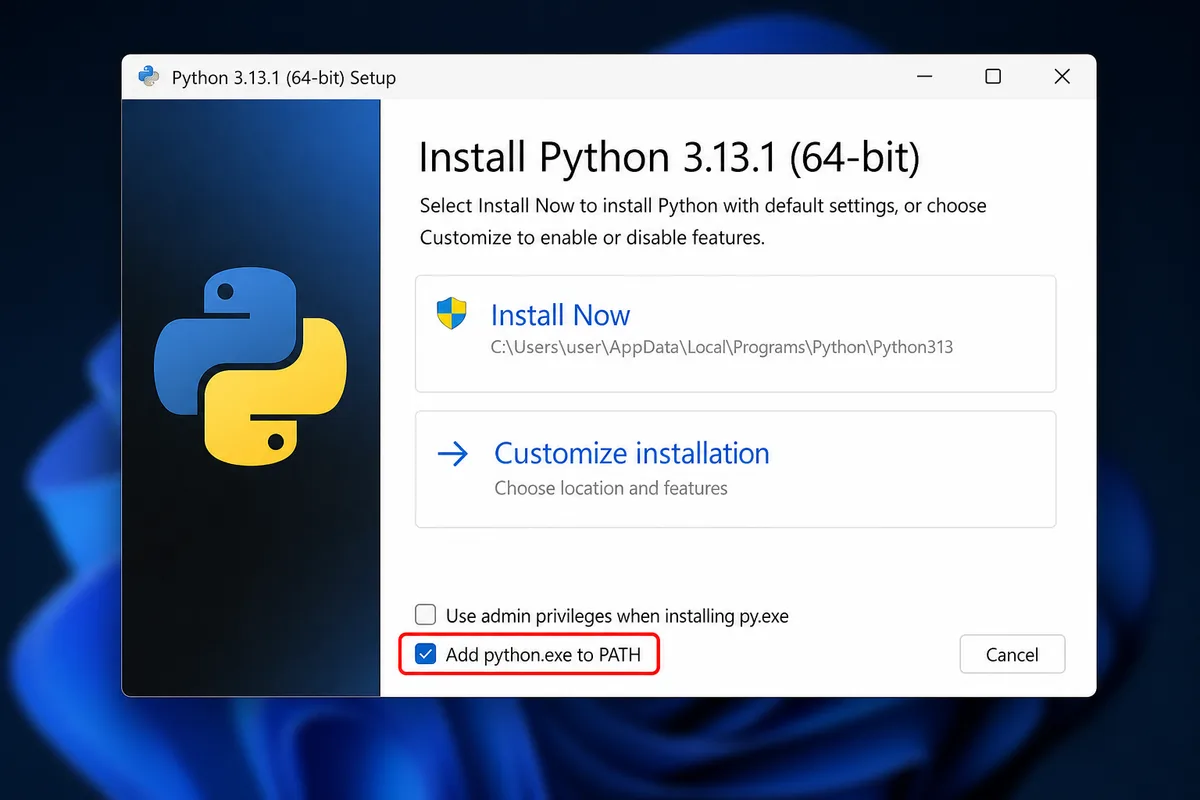
Run the installer:
- Important: Check the “Add Python to PATH” box during installation
- Select “Install Now” for a standard installation
- Or choose “Customize installation” for advanced options
-
Verify the installation:
- Open Command Prompt (cmd) or PowerShell
- Type the following command:
python --version- You should see the version of Python you just installed
Method 2: Install from the Microsoft Store (Windows 10/11)
If you use Windows 10 or 11, you can also install Python from the Microsoft Store:
- Open the Microsoft Store
- Search for “Python”
- Select the version you want (for example, “Python 3.10”)
- Click “Install”
The advantage of this method is that Python updates are handled automatically.
Troubleshooting Common Issues on Windows
Problem: The python command is not recognized.
Solution:
- Make sure you checked “Add Python to PATH” during installation
- You can also try the
pycommand instead - If the problem persists, you will need to add Python to your PATH manually
Problem: Multiple versions of Python are installed.
Solution:
- Use the py launcher with the version number you want:
py -3.9,py -3.10, etc.
Installing on macOS
Recommended Method: Homebrew
Homebrew is a package manager for macOS that simplifies installing Python:
-
Install Homebrew (if you haven’t already):
/bin/bash -c "$(curl -fsSL https://raw.githubusercontent.com/Homebrew/install/HEAD/install.sh)" -
Install Python:
brew install python -
Verify the installation:
python3 --version
Tips for macOS
- On macOS, the
pythoncommand may refer to Python 2 (preinstalled). Always usepython3to be sure you are using Python 3. - To make things easier, you can create an alias in your
.zshrcor.bash_profilefile:echo 'alias python=python3' >> ~/.zshrc echo 'alias pip=pip3' >> ~/.zshrc source ~/.zshrc
Installing on Linux
Most Linux distributions come with Python preinstalled, but it is often an older version. Here is how to install the latest version:
Ubuntu / Debian
# Update packages
sudo apt update

# Install Python 3 and pip
sudo apt install python3 python3-pip

# Verify the installation
python3 --version
Fedora
# Install Python 3 and pip
sudo dnf install python3 python3-pip

# Verify the installation
python3 --version
Arch Linux
# Install Python 3 and pip
sudo pacman -S python python-pip

# Verify the installation
python --version
Installing pip (the Package Manager)
pip is the standard package manager for Python. It lets you easily install third-party libraries.
Check Whether pip Is Installed
# On Windows
pip --version

# On macOS/Linux
pip3 --version
Install pip (If Needed)
If pip is not installed:
# Download the installation script
curl https://bootstrap.pypa.io/get-pip.py -o get-pip.py

# Run the script
python get-pip.py  # On Windows
python3 get-pip.py  # On macOS/Linux
Update pip
It’s important to keep pip up to date:
# On Windows
pip install --upgrade pip

# On macOS/Linux
pip3 install --upgrade pip
Virtual Environments
Virtual environments are essential for managing the dependencies of different Python projects. They let you isolate the libraries and their versions for each project.
Why Use Virtual Environments?
- Isolation: Avoid dependency conflicts between projects
- Reproducibility: Make it easier to share and reproduce your environments
- Cleanliness: Keep your global Python installation clean
Using venv (Built into Python)
venv is the virtual environment module built into Python 3:
# Create a virtual environment
python -m venv mon_env  # On Windows
python3 -m venv mon_env  # On macOS/Linux

# Activate the virtual environment
# On Windows
mon_env\Scripts\activate

# On macOS/Linux
source mon_env/bin/activate

# Deactivate the environment
deactivate
Using Conda (a Popular Alternative)
Conda is a popular environment and package management system, particularly in the data science community:
# Install Miniconda (lightweight version of Conda)
# Download the installer from https://docs.conda.io/en/latest/miniconda.html

# Create a Conda environment
conda create --name mon_env python=3.10

# Activate the environment
conda activate mon_env

# Deactivate the environment
conda deactivate
Recommended Development Tools
To get the most out of Python, here are some recommended development tools:
Code Editors and IDEs
| Tool | Type | Advantages | Link |
|---|---|---|---|
| Visual Studio Code | Editor | Lightweight, extensible, free | vscode.dev |
| PyCharm | IDE | Advanced features, powerful debugger | jetbrains.com/pycharm |
| Jupyter Notebook | Notebook | Ideal for data analysis and learning | jupyter.org |
Recommended VS Code Extensions
If you use Visual Studio Code, these extensions will improve your experience:
- Python (Microsoft): Core Python support
- Pylance: Advanced Python language server
- Python Docstring Generator: Automatic documentation generation
- Python Test Explorer: Interface for running and debugging tests
- indent-rainbow: Indentation visualization
- autoDocstring: Automatic docstring generation
Recommended Project Structure
Good project organization makes development and maintenance easier. Here is a recommended structure:
mon_projet/
│
├── README.md               # Documentation du projet
├── requirements.txt        # Dépendances du projet
├── setup.py                # Configuration du package (si applicable)
├── .gitignore              # Fichiers à ignorer dans Git
│
├── mon_package/            # Package principal (nom de votre application)
│   ├── __init__.py         # Marque le répertoire comme package Python
│   ├── main.py             # Point d'entrée du programme
│   ├── core/               # Fonctionnalités principales
│   │   └── __init__.py
│   └── utils/              # Fonctions utilitaires
│       └── __init__.py
│
├── tests/                  # Tests unitaires et d'intégration
│   ├── __init__.py
│   └── test_main.py
│
└── docs/                   # Documentation
    └── index.md
Create a New Project
Here is how to set up this structure:
# Create the base structure
mkdir -p mon_projet/mon_package/{core,utils} mon_projet/tests mon_projet/docs

# Create the __init__.py files
touch mon_projet/mon_package/__init__.py
touch mon_projet/mon_package/core/__init__.py
touch mon_projet/mon_package/utils/__init__.py
touch mon_projet/tests/__init__.py

# Create the other important files
touch mon_projet/mon_package/main.py
touch mon_projet/README.md
touch mon_projet/requirements.txt
touch mon_projet/.gitignore
Managing Packages with pip
Install Packages
# Install a package
pip install nom_du_paquet

# Install a specific version
pip install nom_du_paquet==1.2.3

# Install from requirements.txt
pip install -r requirements.txt
Manage Dependencies
# Generate the requirements.txt file
pip freeze > requirements.txt

# List installed packages
pip list
Final Checklist
Before you start coding, make sure that:
- Python is correctly installed (
python --version) -
pipis installed and up to date (pip --version) - You know how to create and activate a virtual environment
- You have chosen a code editor or an IDE
- You are familiar with the recommended project structure
- You know how to install packages with
pip
Common Problems and Solutions
| Problem | Solution |
|---|---|
| ”Python is not recognized…” | Add Python to the system PATH |
| Dependency conflicts | Use virtual environments |
| Permission denied | Use sudo (Linux/Mac) or run as administrator (Windows) |
| SSL/TLS errors | Update pip and the SSL certificates |
Additional Resources
- Official Python documentation
- Real Python - Installing and Setting Up Python
- The Hitchhiker’s Guide to Python
Congratulations! You have now installed Python and set up a working development environment. You’re ready to start coding in Python.
In the next tutorial, we will explore the basics of Python syntax so you can start writing your first programs.
Comments
Comments are powered by GitHub Discussions
Sign in with GitHub to join the discussion